My wooden boards are irregular and I always have some problems to arrange them in the proper way. Under every board I have to fit pieces of cardboard or newspapers to lift them up or down. In this way I get flat and almost equal surface, but they will never be totally aligned. This is the biggest problem I have when arranging the set. All the rest is pure fun and joking with light and shadows!
My props collection is poor (don't say this to Mr. M, he definitively disagree with me!), better to say, I use poor collection of props. Glamor is not my thing, I prefer empty scene and a lot of air all around.
 Nevertheless sometimes I desire a special new props that might be perfect for my sets, but until I find the perfect one, I prefer to be without it. Since some time I have in mind a kind of plate, an pewter plate and I'll find it, sooner or later I will. Patience is something I can share with the world!


I'm observing and admiring how good other bloggers are in using plenty of props and things in their sets with so much nonchalantly. Moreover how good they are in fining cheep and attractive props. I'm not good at all in trading. Few days ago I went to the flea market, but among all those aged stuff I haven't found one single piece that I wanted to have. My mother often says that it's impossible to guess what I might like. This can be the reason why I observe much, but my choice is very limited. For me less is always more and I'm happy when I find our old baking pan in my mother's cellar. The one she forgot in some hidden corner covered with dust. The one that tells so much stories, it's full of memories. I suddenly desire to bring it back to its previous life. My mother in law also has some nice, old baking trays I've already noticed in her kithcen and I've recomemnded her to keep them for me once she will stop using them.

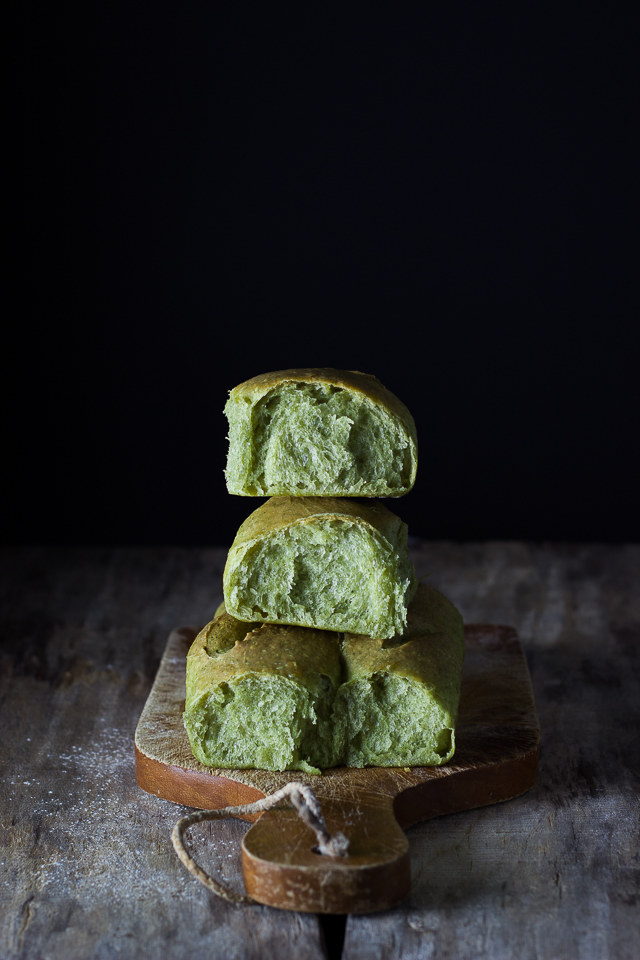
Back to my last set (dark and moody again), this bright green nettle colour combined with old wooden boards and my aged baking tray made a perfect match. Nettles were harvested in my parents's garden and were brought to Italy in train. When I travel I always find an empty space in my bag where to put some special ingredient that I can't find in my second homeland. Continuously going from Italy to Croatia and backwards is making me feel more at home in both places. A part of me is always in both places. Even when we travel to a new destinations, I suddenly feel that I leave forever a piece of my heart there and it never comes back home with me.


Everybody knows how good unpolluted wild herbe, flowers and fruits are and how many advantages we can source from them for our bodies. Useless to list them all again. Web is full of experts that can give better explanations and suggestions about this subject better then myself.
Instead, I offer you the recipe for this green bread that I have experimented combining the recipe for simple bread with olive oil I have slightly adapted to my taste.
I wish I could produce my own starter too and if I succeed in this attempt, my green nettle bread will be the best in the world!


250 gr flour
80 ml milk
30 ml extra virgin olive oil
2 full tablespoons sour cream
30 gr boiled nettles
7 gr fresh yeast
1/2 teaspoon of sugar
pinch of salt
Use gloves while harvesting and washing nettles to avoid stinging rash on your hands. Use only nettle leafs. Wash accurately nettles in cold water and boil them for 5 minutes in salted water. Drain them and let them cool.
Dissolve the yeast and 1/2 teaspoon of sugar in little lukewarm milk and let it raise for 10 minutes.
Mince finely boiled nettles, add to it cold milk and sour cream and blend all together to get green and smooth liquid.
In one bowl put the flour and the yeast and start to knead the dough with the mixer. Gradually add in the mixture the green liquid and continue to knead until all ingredients combine well together. Add a pinch of salt and continue to knead for another few minutes while adding gradually olive oil.
Leave the dough to raise until double the volume (cover the bowls with the PVC wrap or the bowl cover).
Cover the baking tray with parchment.
Place the dough on floury working surface and cut it into 3 equal parts.
Work a bit every piece of dough and give to each one round shape.
Place the dough into baking tray covered with parchment and leave to rest until it double the volume.
Bake in preheated oven at 180°C for 20-25 minutes. The surface of the bread must be light golden brown.


250 gr di farina “00”
80 ml di latte
30 ml di olio extravergine d’oliva
2 cucchiai colmi di panna acida
30 gr di ortiche bollite
7 gr di lievito di birra
un pizzico di sale
Usate I guanti mentre raccogliete e lavate le ortiche per evitare lo sfogo cutaneo sulle mani. Usate solo le foglie delle ortiche. Lavate bene le ortiche nell’acqua fredda e fatele bollire per 5 minuti nell’acqua salata. Una volta cotte, scolate i fate raffreddare le ortiche.
Sciogliere il lievito e 1/2 cucchiaino di zucchero in poco latte tiepido e lasciare lievitare per 10 minuti.
Tritare finemente le ortiche bollite, aggiungete al composto il latte freddo e la panna acida e mixate tutto insieme fino ad ottenere un liquido verde e omogeneo.
In una ciotola unire la farina ed il lievito e cominciare ad impastare con il mixer. Gradualmente aggiungere all'impasto il liquido verde e continuare ad impastare per incorporare bene tutti gli ingredienti. Alla fine aggiungere un pizzico di sale e continuare ad impastare ancora per qualche minuto aggiungendo gradualmente l’olio di oliva nell’impasto.
Lasciare l’impasto a lievitare fino al raddoppio del volume dell’impasto (coprire la ciotola con la pellicola trasparente oppure con il coperchio della stessa ciotola).
Rivestire lo stampo con la carta da forno.
Rovesciare l’impasto sulla superfice da lavoro precedentemente infarinata e tagliarlo in 3 parti uguali.
Lavorare leggermente ogni pezzo dell’impasto e dargli la forma sferica.
Sistemare l'impasto nella teglia rivestita da carta da forno e lasciarlo lievitare fino al raddoppio del volume.
Infornare nel forno già caldo a 180°C per 20-25 minuti. La superfice del pane deve diventare leggermente dorata.


250 gr brašna
80 ml mlijeka
30 ml extra djevičanskog maslinovog ulja
2 u vrh pune žlice kiselog vrhnja
30 gr kuhane koprive
7 gr svježeg kvasca
prstohvat soli
Obucite rukavice dok berete i dok perete koprive da si ne opečete ruke. Upotrijebito samo listove koprive. Dobro operite koprive u hladnoj vodi i prokuhajte ju 5 minuta u slanoj vodi. Kuhanu koprivu ocijedite i ohladite.
Otopiti kvasac i 1/2 žličice šećera u malo mlakog mlijeka i ostaviti da se diže 10 minuta.
Usitnite koprive, dodajte im hladno mlijeko i kiselo vrhnje i izmiksajte sve skupa da bi dobili zelenu i homogenu tekućinu.
U zdjelu staviti brašno i kvasac, te početi mijesiti mikserom. Postepeno u tijesto dodavati zelenu tekućinu uz neprestano miksanje da se svi sastojci dobro sjedine. Na kraju dodati u tijesto prstohvat soli i miksati još par minuta postepeno dodavajući u tijesto maslinovo ulje.
Ostaviti tijesto da se diže dok mu se volumen ne udvostruči (pokriti zdjele prozirnom folijom ili poklopcem).
Obložiti kalup masnim papirom za pečenje.
Isuti tijesto iz zjele na pobrašnjenu radnu površinu i podijeliti g ana 3 jednaka dijela.
Lagano premijesiti svaki komad tijesta i oblikovati ga u kuglu.
Posložiti kugle od tijesta u kalup obložen masnim papirom za pečenje i ostaviti da se tijesto diže dok mu se volumen ne udovostruči.
Peći u prethodno zagrijanoj pećnici na 180°C oko 20-25 minuta. Kruh mora dobiti lagano zlatno-smeđu boju po površini.


Super izgleda! I ja sam pravila skoro isto sa koprivom, nisam još objavila recept.
RispondiEliminaMoraću da isprobam i ovaj. ;)
Kad objaviš, usporedit ćemo recepte! Ovaj recept dobro uspije, a vjerujem da je tvoj isto super!
EliminaMoj je malo posnija varijanta i sa integralnim brašnom. :) Uporedićemo. :)
EliminaDjeluje super ukusno, a i fotke su jako lijepe.
RispondiEliminaHvala Tanja, mene je oduševio! Mljac
EliminaFotke su ti poezija. <3
RispondiEliminaMoja vjerna Kristina, hvala ti!
EliminaPrekrasna boja i super ideja za žilet :)
RispondiEliminaJel da, to sam tati drmnula neku staru zalihu, žileta danas nigdje nema, barem ne ovdje na zapadu!
EliminaDruga slika odozgo, tijesto u zdjeli koje se diže. E to je antologijska slika. Ne znam postoji li doduše antologija fantastičnih slika tijesta koje se diže, ali ova slika svakako u nju pripada :) u stvari, sve su ti slike fantastične... a kruh tako prekrasno izgleda, sočno, mekano, s finom koricom... Bravo, prijateljice!
RispondiEliminaHa ha ha, ta mi je antologijska slika skoro iscurila iz zdjele, a skoro mi je bilo i žao premijesiti tijesto! Hvala draga moja, jel sad vidiš zašto te ne mogu iznevjeriti, poslije ovakvih riječi ne bi bilo fer!
RispondiEliminaNe gleda mi se više TV... uzmem samo i listam tvoj blog. Slažem se sa Marijom da ti je ona slika sa zelenim testom koje se diže fenomenalna. A hleb izgleda tako ukusno...
RispondiEliminaHvala Katice! Vas dvije ste mi za u totalnoj simbiozi, i to ste onda vi krive kad mi uspije i tijesto i fotografije!!! Telepatski mi stiže masa pozitivne energije...Pribaj ga u modli za kuglof!
RispondiEliminadivno izgleda, super su fotke!
RispondiEliminaHvala Tamara!
EliminaHehe, i ja sam baš u fazi pripreme dasaka za slikanje, konačno sam ih nabavila...;) Inače hleb predivno izgleda a fotke su fantazija!:)
RispondiEliminaHvala Natalija, daske su zakon, što starije to bolje!
EliminaPredivne fotkice i predivan krušac. Slažem se s Marijom... slika dizanog tijesta je apsolutno savršena.
RispondiEliminaCure moje ako ovako nastavite mogla bih se uobraziti!!! Hvala ti Natalie, kruh je stvarno odličan.
EliminaPoezija u slici, fotografije govore koliko je testo savršeno. Miriše na dobro i ukus koji se pamti :)
RispondiEliminaHvala ti na srdačnim riječima!
EliminaThe nettle bread is compleatly wrong? Are you sure you wrote the right measures?
RispondiEliminaI'm sorry to hear this and yes, the measures are correct.
Elimina